


 Tala Hua Gosht | |||||||||||||||||||

|
| ||||||||||||||||||
| |||||||||||||||||||
Friday, October 26, 2012
EID Recipes


 200 grams Mutton
Wednesday, October 24, 2012


Desserts Recipes
Desserts Recipes
Special Zafrani Zarda Rice Recipe

- 2 cup Sela Rice (soaked for 2 to 3 hours)
- 1 ½ cup Sugar
- 6 to 8 Pistachio (chopped)
- 6 to 8 Almond (chopped)
- Few Ashrafis (candy fruit) murabba
- 3 Cloves
- Oil or Ghee
- 4 to 6 Green cardamoms (Choti Ilaichi)
- ½ cup Milk
Zarda is a traditional Pakistani sweet dish, made by boiled rice with (orange) food coloring, milk and sugar, and flavoured with cardamoms, raisins, saffron, pistachios or almonds. The name Zarda comes from Persian and Urdu ‘zard’ meaning ‘yellow’, hence named since the food coloring added to the rice gives it a yellow color. Zarda is typically served during a meal or distributed during special religious occasions like Nisf-e-Shaban. In Pakistan, zarda was and still remains a popular dessert on weddings.
Special Zafrani Zarda Rice Recipe for Eid
How To Make Zarda Boil water then put rice in it for 15 minutes rice in the boil water and let it and add 2 to 3 cloves cook for 5 to 8 mins. When the rice is boiled, drain all the extra water.
Now take a big bowl or dish and put boiled rice, milk, food colour, sugar,dry fruits and ashrafies ( murabba )as well and mix it well.
In a pan, put ghee and fry cloves and cardamom, when they turn brown and an aroma starts to come, add rice and mix it well and then put on dum for 5 min on high heat. Then put it on slow heat and then serve
Simple CheeseCake Recipe

- 1 cup graham cracker crumbs
- 1/4 cup finely chopped walnuts
- 3 tablespoons brown sugar
- 1 tablespoon ground cinnamon
- 1/2 teaspoon ground nutmeg
- 5 tablespoons butter, melted
- 24 ounce cream cheese
- 1 cup white sugar
- 1 cup sour cream
- 1 cup heavy cream
- 3 tablespoons all-purpose flour
- 1 tablespoon vanilla extract
- 3 eggs
How To Bake Simple Cheesecake Recipe
Preheat oven to 350 degrees F (175 degrees C). In a medium bowl, combine graham cracker crumbs, chopped walnuts, brown sugar, cinnamon, nutmeg and melted butter. Mix well and press into the bottom of a 9 inch spring-form pan. Bake in preheated oven for 10 minutes. Remove from oven and allow to cool.
In a large bowl, beat cream cheese and sugar together until smooth. Beat in sour cream and heavy cream. Blend in the flour and vanilla. With mixer on low speed, add eggs one at a time. Pour batter over crust.
Bake in the preheated oven for 60 to 70 minutes, or until center is almost set (filling will be soft). Refrigerate at least 6 hours or overnight before removing from pan.
Gulab Jamun

- Ghee for deep-frying
- For the sugar syrup
- 3 cups sugar
- a few saffron (kesar) strands (optional)
- For the gulab jamuns
- 2 cups (250 grams) haryali mava (khoya), grated
- 5 tbsp plain flour (maida)
- 1/4 tsp cardamom (elaichi) powder
Gulab Jamun is a popular dessert in countries of the Indian Subcontinent such as India, Pakistan, Sri Lanka, Nepal and Bangladesh. It is made by reducing low fat milk and is slightly yellowish in colour and is also loose and sticky in consistency. Frying these gulab jamuns is an art in itself.
MethodIn a large pan, dissolve the sugar in 1.5 cups of water and boil.
Simmer over slow flames till the syrup is of a string consistency.
Remove any impurities which float on top of the syrup using a slotted spoon.
Add the saffron and keep the syrup warm.
Simmer over slow flames till the syrup is of a string consistency.
Remove any impurities which float on top of the syrup using a slotted spoon.
Add the saffron and keep the syrup warm.
How To Make Gulab Jamuns
In a bowl, combine the khoya, flour and cardamom powder and mix well. Knead to a firm dough without using any water.
Divide this mixture into 25 equal portions and roll into rounds. These should have no cracks on the surface as otherwise the gulab jamuns will crack while frying. Refrigerate for 10 to 15 minutes.
Deep fry in ghee over a slow flame till the jamuns are golden brown in colour (approximately 10-12 minutes).
Drain and immerse in the warm sugar syrup. Soak for 30 minutes.
Khoya is a milk food widely used in the Pakistani cuisine, made of either dried whole milk or milk thickened by heating in an open iron pan.
Dry Sawaiyan (Dry Vermacellies)

- 1 cup Sawaiyan (Vermacellies)
- 4 tablebspoon of ghee or butter
- 3 to 4 green cardamom (Chhoti Ilaichi)
- 4-5 tbs. sugar
- 1 cup water
- Dry fruit
How To Make Sookhi Sewaiyan
- Add ghee or butter, a cup of Sawaiyan, roast them on very low flame till their color changes to a darker shade in a pan.
- In another pan, add sugar, water and cardamom seeds and bring them to a boil.
- Then add the Sawaiyan to this sugar syrup.stir constantly. Add dry fruits.
- Cover and let cook for 5-6 minutes till the water has dried and the Sawaiyan have become tender.
Tuesday, October 23, 2012

SKIN TYPES
Oily skin

Oily skin is shiny skin, especially in the T-zone (from the forehead, down the nose to the chin). You may have enlarged pores, and you may be prone to blackheads and breakouts due to the overproduction of the sebaceous (oil-producing) glands. The good thing about oily skin is it ages better than dry skin because the oils keep the skin plump allowing fewer wrinkles to form. Many young women have oily skin but as they age, they may find their skin becomes more dry, especially after age 35.
To take care of your skin, wash with a cleanser formulated for oily skin before you go to bed. Exfoliate twice weekly with a gentle scrub and use oil-free moisturizers. If you suffer from breakouts, an astringent may help. When it comes to blush and bronzers, powdered blends work better than liquid ones and look for oil-free options for tinted moisturizers or foundations. See the Best Facial Cleansers for Acne-Prone Skin.Combination/Normal Skin

Most women (some experts say up to 70 percent, although how anyone arrived at that number is beyond me), have combination, or "normal" skin. Combination skin means you may have a slightly oily T-zone and drier cheeks with dry patchy spots here and there. You may also have larger pores on your cheeks and possibly your forehead. This skin type has medium pores, a smooth and even texture, good circulation and a healthy color.
Dry Skin

After I turned 35 my skin magically became much drier. This skin fluctuation can definitely be attributed to hormones. Dry skin feels tight, especially after cleansing. You have a tendency towards fine wrinkles, flaking and red patches. In women of color, skin may appear ashy or dull from dead skin buildup.
Dry skin requires special care. I prefer heavy cleansers and moisturizers over the lightweight products of my oilier years. I exfoliate weekly and even slather on primers before I apply foundation just to plump the skin up as much as possible. I carry Evian spray water with me when I'm traveling to less humid areas and I keep a bottle on my desk to spray my face in the winter, when
Sensitive Skin

Sensitive skin tends to be thin, and delicate with fine pores. If you are easily irritated by the sun, certain cosmetic products and if you are prone to redness, itchy patches or blotchy skin, you likely have sensitive skin.
Finding the right cleansers and moisturizers for your skin type can be tricky. The good news is many companies have developed products specifically for sensitive skin. Look for mild products that contain no scents. Many drugstores and department stores allow you to return products, so check out the return policy before you buy or ask if the store carries freebies so you can try before you buy.
Aging or Sun-damaged Skin
This skin also feels tight with visible wrinkles, slack skin tone -- especially around the cheeks and jawline -- with leathery texture and broken capillaries.To care for aging skin, you should consider using moisturizers and heavy creams to plump up your fine wrinkles. I love Retin-A which has done wonders on my skin tone and has smoothed some fine wrinkles. And if you are really upset about your deeper lines, you can have them frozen with Botox or filled with injectables. More on this in How to Fix Deep Wrinkles: 5 wrinkle fixes you can get at your doctor's office.
Skin type chart

Homemade beauty tips for pimples:
- You can use mixture of neem and turmeric on your face for 20 min and rinse with lukewarm water.
- Prepare a mixture of turmeric, curd and three drops of oil. You can apply like a face pack for 10 min in the night.
- Prepare a paste of turmeric and sandal wood and you use it daily.

Good Foods That are Great for Your Skin

This is true at all levels including the level of your skin. People who want to have skin that looks young and supple and that has that healthy natural glow to it need to start by paying attention to what types of foods they are putting into their bodies. Take a look at the following twenty foods that are good for your skin and think about which ones you can easily add to your diet to get that youthful skin appearance that you desire:
1. Water. The number one thing that you can put into your body if you want great-looking skin is water. The more water you drink, the more you flush all of the other stuff out of your body and the healthier your skin is going to look.
2. Green tea. When you’re not drinking water, you should be drinking green tea. It has many, many different health benefits including benefits for the skin. You can drink it cold or warm. Avoid adding sugar or milk to it if you want the best benefits for your skin.
3. Cantaloupe. This food increases antioxidants in your body which increases your ability to absorb free radicals which in turn reduce skin problems so that you have healthier skin.
4. Tomatoes. This is another food that is rich in anti-oxidants and so will have the same skin-boosting benefits that the cantaloupe will give to you.
5. Berries. Strawberries, blueberries and blackberries are all berries that are also rich in antioxidants. Eat them alone, toss them in cereal or add them to the sides of other dishes to increase the healthiness of your skin all throughout the day.
6. Plums. There really is a long list of fruits that you can eat that are rich in antioxidants and that are therefore good for your skin.
7. Sweet potatoes. This is a vegetable alternative to the cantaloupe and tomato options that you may want to try to get those free radicals flowing healthfully throughout your body and fighting off skin problems.
8. Broccoli. This is a great vegetable that has many different health benefits which is why you’re always hearing that you should “eat your broccoli”. One of the things it contains a whole lot of is Vitamin A, a vitamin that is great at improving the turnover of cells in the skin. This means that when you eat broccoli, your skin gets renewed more quickly and the freshest (nicest looking) skin is on top where everyone you meet can see it.
9. Spinach. This food doesn’t just make you strong like Popeye. It’s also rich in the same Vitamin A properties that broccoli has so it’s good for your skin as well. You never saw Popeye looking like he had dry, aged skin did you?!
10. Carrots. If you want to get your Vitamin A but you aren’t that big of a fan of leafy green vegetables then you may want to turn to carrots to improve your skin with this vitamin.
11. Low Fat Dairy. Diary products are another really great source of Vitamin A so they can be really good for the skin. However, you want to avoid the fat that is in a lot of these foods so make sure that you look for low-fat versions of cheese and milk that are rich in Vitamin A.
12. Omega3 Rich Fish Dishes. Omega3 is that “good fat” that we’re always trying to get even though we try to avoid the “bad fat”. One of the things that the Omega3 fats do is ward off any kind of inflammation. This means they’re good for the skin. You can find these in many different fish dishes including tuna, shellfish, sardines and salmon.
13. Flax seeds. You don’t have to eat fish to get the essential fatty acids that your body needs (and that improve your skin). An alternative option is to eat flax seeds and to cook with flax seed oil.
14. Walnuts. These are yet another option that you can choose in addition to flax seeds or fish dishes if you want to improve your skin with those essential fatty acids.
15. Grapefruit. This food is really rich in Vitamin C. Vitamin C is great for people concerned about skin problems because it delays or reduces wrinkles.
16. Oranges. Just like with grapefruits, these are great for the skin because they are so rich in Vitamin C.
17. Brussel Sprouts. Most people think that you have to eat citrus fruits to get Vitamin C but there are a few vegetables out there that have it as well. Brussel sprouts are a good one for the skin. Peas are another option.
18. Whole wheat. Another ingredient in some foods that is really good for your skin is selenium. This is found in whole wheat cereals, breads and baked goods. This improves the skin at a cellular level and keeps you looking young and beautiful.
19. Lean red meat. Some people have poor skin because they don’t have enough iron in their diets. If you are concerned that you’re too pale or you have dark circles under your eyes then you may need more iron. Red meat is a great source for that but make sure that you’re not eating any red meat that is too high in fat.
20. Eggs. Eggs are a good iron-providing alternative for people who don’t want to eat much red meat.
Adding these foods to your diet should go a long way towards improving the healthfulness of your skin. However, it’s just as important to cut out foods from your diet as it is to add foods if you do want healthy skin. Make sure that you reduce your intake of caffeine, bad fats, salt, sugar, etc. to maximize the healthy benefits that your skin is getting from the intake of these other good foods!

Homemade beauty tips for black spots are:
- You can apply a paste of oil and mehendi on the face.
- You can apply mixture of glycerin and lemon juice on the spots.
- You can use curry leaves and turmeric on the face and rinse with warm water.

- You can also apply on the black spots Grinded basil leaves, neem leaves, and mint in equal proportions.
- Prepare a paste of honey and saffron and apply it on your face to remove black spots permanently.
- You can remove wrinkles on your face by applying sandal wood powder, rose water, and glycerin.
Homemade beauty tips for glowing skin are;
- For tanning purpose you can use face pack of honey mixed with egg white.
- For smooth and glowing skin purpose you can mix well yogurt, almonds and oats along with honey. Apply as a face pack for 5 min and cleanse with warm water.
- For cleansing purpose you can use natural cleanser cucumber along with milk. Apply to your face for 10 min. It also balances Ph of your skin.
- If you have oily skin, you can apply a paste of lemon, egg white and grapes. Grapes soften your skin, egg white will tighten your skin, lemon will acts as a cleanser.
- Good homemade moisturizer for dry skin is mixture of vegetable oil, lemon, and honey.
- You can apply mixture of milk and honey for a glowing skin.
- Mix
a cup of honey in your bath water for smooth and soft skin.


- For a homemade body pack, get ready with a paste of almonds and mint leaves. You can apply this paste all over your body until it dries.
- For fades spots apply carrot juice daily. For neck and under arms apply lemon and cucumber mix.
- You can apply stick paste of egg along with sugar to remove facial hair.
- You want to make your skin supple. You can apply banana extract on your face daily.

- For a glowing and fair skin apply natural bleach made up of sundried and powdered oranges along with milk.
- For skin brightening, you can use tomato juice, and you can also use vinegar and rose water in equal proportions.
- If you have dry skin, you can use paste of olive oil, lemon juice and egg yolk.
- If you have oily skin, you can use green gram powder or basin with milk.
- Apply the combination of cream of milk and raw turmeric on the face and clean it after 25 minutes. It will craft your skin fair.
- For instant glow, you can apply mixture of milk and fenugreek and let it dry.

beautiful hands
How To Give Yourself an At-Home Menicure
Giving yourself a professional pedicure
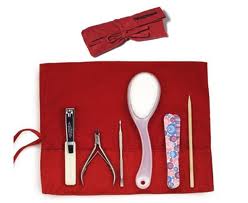 First remove old nail polish first remove old nail polish
What You’ll Need

Step 1:
Soak nails in a small dish of warm water to soften up the cuticles. After about a minute of soaking, remove all nail polish.

Step 2:
When the nail beds are nice and toasty, remove your hands from the water and apply cuticle oil at the base of your nails. This stuff makes it easier to get rid of all those long cuticles. Let the oil soak in for about a minute or two.

Step 3:
Take the orange stick, {that’s the little wooden poky stick} and press in your now soft cuticles. You’re going to shove them back where they came from so they won’t bother anyone anymore. Once you’re done with that, give your nails another soak to recover from the trauma.

Step 4:
This step is optional, but it makes the difference between a salon manicure and a chip-off-by-tomorrow-morning-manicure, so I highly recommend not skipping this one. {I fill up a cheap Dollar Store spray bottle with rubbing alcohol and keep it in my nail kit.} Spray your nails with the alcohol and rub it around. The alcohol will dissolve all the oils on your fingers, and you want to get rid of as much oil as possible because this is what prevents the nail polish from sticking.

Step 5:
This is when we start to get fancy. File your nails with the nail file traveling ONE direction. The back and forth filing motion we all do weakens the nails and allows them to break more easily, so only file one way. File them into a squoval. I know it’s a made up word, but take the advice of all the salons in downtown Chinatown and make a nice shape that’s the combination of a square + oval. Square tops + oval edges = sassy pants.

Like so.
See, I have really short nails but when they’re shaped nicely it makes all the difference in the world.

Step 6:
Now you’re ready to get busy. Paint one coat of clear base coat on your nails. Start at the cuticle and paint down in one stroke to the tip of your nail. Three swipes of base coat should cover the whole nail. Let that dry for at least two minutes before you move on or you’ll end up with smudgy nails.

Step 7:
This step is really important. Another one that will make the difference between long lasting or a cheap at home manicure. Take the bottle of nail polish you’re going to use for color and ROLL it between your hands. If you shake it to mix up the color you’ll end up with bubbles in the polish and your manicure will go to pot. Roll it back and forth quickly instead to swish around the color and you’ll end up with perfect nail color.

Step 8:
Finally, it’s time to paint!
Start at the base of your nail and swipe the polish all the way to the tip of the nail. Dip the brush again and repeat two more times until your entire nail is covered in polish. Then take a quick swipe along the tip of the nail to make sure it’s covered in polish; this will slow down the chipping process.
Repeat on all your nails.

Don’t they look fancy?
Now let them sit for at least 20 minutes. Seriously. Watch your favorite show, read a book, sit on your porch and watch the world go by, but whatever you do don’t touch your nails.

Step 9:
Very, very carefully clean up the extra nail polish around the edges of your nails. Wrap a tissue around an orange stick, dip it into a tiny bit of nail polish remover, and clean up the errant nail polish. BE CAREFUL or you’ll ruin your manicure.
Subscribe to:
Posts (Atom)
5 Food All Pregnant Women

All About Baby Massage


